

How to Install a Neon Sign Safely: A Complete Guide for Every Wall Type
Every sign we ship leaves our workshop tested and ready to hang (browse ready-to-install signs) — but a clean install is what makes it look built-in rather than bolted-on. After designing, making, and shipping thousands of custom LED neon signs, we’ve turned setup into a process that works on any surface, takes most people 15–30 minutes, and keeps both you and the sign safe. This guide covers the tools you’ll need, step-by-step mounting for every wall type, no-drill and ceiling options, how to assemble larger multi-panel signs, and how to fix the small things that occasionally go sideways. This neon sign installation guide walks you through it so, whether it’s your first time or your fiftieth, you can hang your sign yourself with confidence.
Good to know first: modern LED neon (what we make) runs cool, low-voltage, and light — a typical 2–3 ft sign weighs just 2–5 lb. That makes it far more forgiving to mount than old glass-tube neon, and it means you do NOT need a professional for the vast majority of installs — neon sign installation is genuinely DIY-friendly.
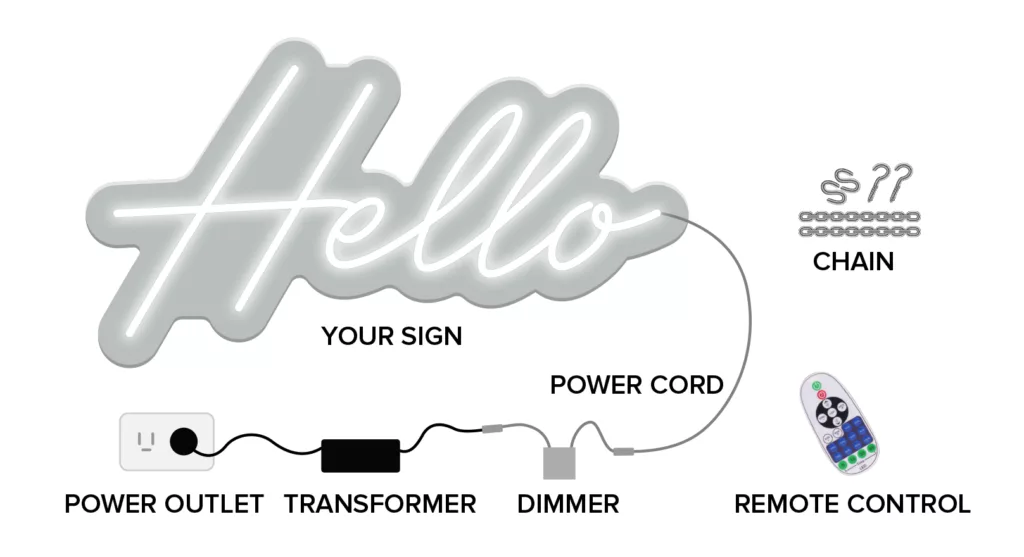
Meet the parts of your sign
Your sign arrives with everything it needs: the sign on its clear acrylic backboard, a power cord, a transformer (the small box that converts household power to safe low voltage), an inline dimmer, a remote control, and mounting hardware (screws/standoffs plus hanging chain or wire). The diagram above shows how they connect.
Tools & materials you’ll need
- Power drill + bits (add a masonry bit for brick/concrete, a tile/glass bit for tile)
- Screwdriver (usually included in your mounting kit)
- Level (a phone level app is fine) + measuring tape + pencil
- The mounting kit shipped with your sign — pre-drilled standoffs/screws, or hanging chain/clips
- Wall anchors matched to your surface (see the table below)
- Optional, no-drill: clear adhesive hooks or 3M strips rated above the sign’s weight, painter’s tape, a stud finder
Before you start: 3-point pre-installation check
- Power it on and inspect it. Light the sign before mounting to confirm every segment works. If anything arrived dead or damaged, photograph it and contact us within 7 days and we’ll arrange a free replacement — it’s far easier to sort now than after it’s on the wall. (Every sign carries a 2-year manufacturer warranty against defects.)
- Plan the placement. Hold the sign — or a paper template — against the wall at eye level, use your level, and mark the mounting-hole positions in pencil. Measure twice.
- Find your power source. Note the nearest outlet and how the clear cord will run, and decide where the remote/dimmer will live.
Choose your mounting method
| Method | Best for | Works on |
|---|---|---|
| Screw / standoff mount | A permanent, flush look | Drywall, plaster, wood, brick, concrete, tile |
| No-drill hanging (adhesive hooks, chain/wire, suction) | Renters, glass, backdrops, easy repositioning | Smooth walls, windows, ceilings, existing fixtures |
| Freestanding / leaning | Zero-damage, temporary | Shelves, mantels, against a wall |
Step-by-step: mounting by wall type
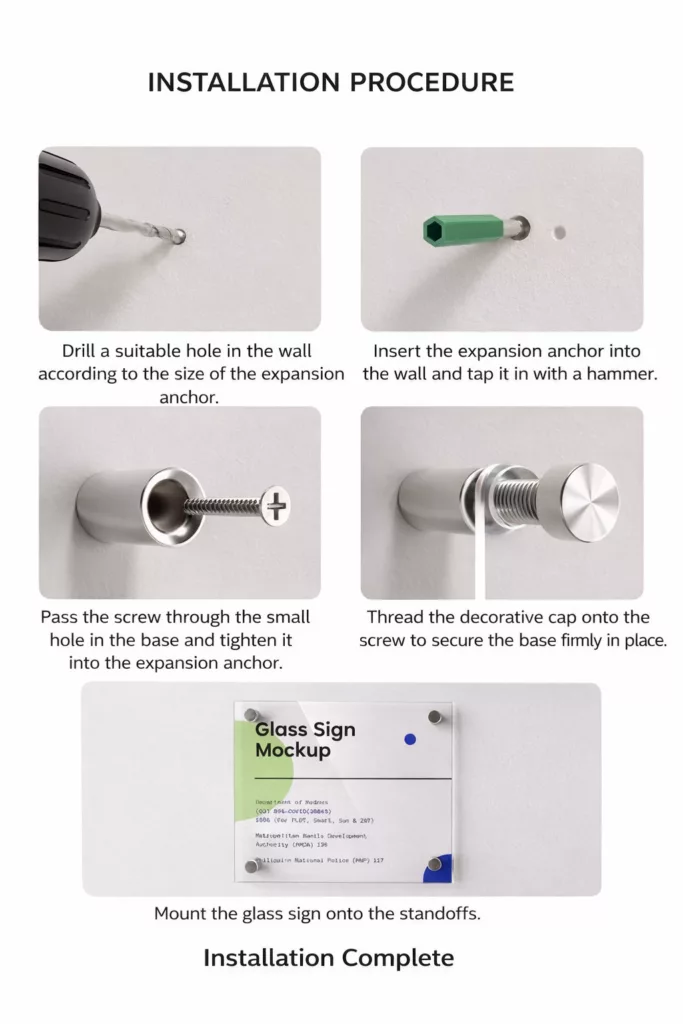
Drywall / plasterboard (most common)
- Mark your holes with a level and pencil.
- Drywall is hollow, so use self-drilling plastic anchors or toggle bolts unless you can hit a stud. Drill a pilot hole and tap the anchor flush.
- Drive the standoff screws into the anchors, leaving the heads slightly proud.
- Hang the sign’s acrylic backboard on the standoffs and tighten. Check level.
- Connect power (see Powering your sign).
Plaster (older lath-and-plaster walls)
Plaster is brittle. Put a strip of painter’s tape over the mark before drilling to reduce chipping, drill slowly, and use plaster-rated anchors. If you hit the wood lath behind it, a standard screw holds well.
Brick, concrete & masonry (the most secure surface)
- Use a masonry bit. Drill into the brick face for the strongest hold, or into the mortar line if you may want to remove the sign later — mortar is easier to patch.
- Insert masonry/expansion anchors sized to your screws, then mount as above.
Tile (kitchens, bathrooms, backsplashes)
Tape over the mark to stop the bit wandering, start at low speed with a tile/glass bit (no hammer setting) until you’re through the glaze, then switch to a masonry bit for the wall behind and anchor into that substrate.
Glass & windows (no drilling)
Never drill glass. Use suction-cup hooks or clear adhesive hooks at two top points, and for a floating look, hang from clear fishing line — always with a second line as a backup. Run the cord to the nearest outlet. Perfect for storefront displays.
Wood, paneling & fences
The easiest surface — drive screws straight in, no anchors needed. For thin paneling, find the framing behind it first.
How to hang a neon sign without drilling
Ideal for renters, glass, and temporary setups:
- Adhesive hooks / 3M strips rated above the sign’s weight, on a smooth, clean, dry wall.
- Removable picture hooks for light signs.
- Hang from a shelf, curtain rod, or existing fixture with the supplied wire.
- The mount-to-a-board trick: attach the sign to a lightweight backing board, then hang the board — great for backdrops you’ll move.
Heads-up: adhesives don’t grip textured or freshly painted walls well — use a mechanical anchor or the hanging kit there instead.
How to hang a neon sign from the ceiling
- Find a ceiling joist with a stud finder (drywall alone won’t hold weight).
- Screw a hook or eye-bolt into the joist, or use a heavy-duty toggle if you can’t hit one.
- Attach the sign with the supplied chain, wire, or clips from at least two points and level it.
- Clip the cord along the ceiling line to the nearest outlet.
Installing large or multi-panel signs
Oversized signs (roughly 96×60 in and up) are produced and shipped in two or more sections — there’s no other safe way to ship them. Assembly is straightforward and the seams are designed to disappear:
- Lay the sections out on the floor first and dry-fit them against your pencil marks.
- Mount section by section, working left to right (or top to bottom), keeping each panel level with the last so the seam lines up.
- Join per the assembly guide we include with the order, then connect power.
We plan every split so the finished piece reads as one seamless sign — and because even large pieces install in sections, they stay manageable — if you’d like guidance for your specific layout, our team will walk you through it.
Weight, studs & anchors — quick reference
- Under ~5 lb (most signs): one quality anchor per hole is plenty.
- Larger / multi-panel signs: hit a stud where possible (studs are ~16 in apart), or use toggle bolts.
- Always support from two points so the sign can’t pivot.
- When in doubt, over-spec the anchor — LED neon is light, so there’s rarely a downside.
Powering your sign safely
- LED neon is low-voltage — the adapter converts household power to a safe level, so it plugs into a standard outlet with no special wiring.
- Keep the adapter ventilated and out of sight; don’t coil it tightly or bury it. Conceal the cord behind furniture, in a wall cavity, or in surface conduit.
- Your remote is also a dimmer — adjust brightness, switch flashing modes, and turn the sign on/off from it. Pair it once on first power-up.
- RGB (color-changing) signs run on a single shared controller, so a color or mode change applies to all connected sections at once — individual per-section control isn’t possible unless each has its own controller.
- Hardwiring a sign into the wall (removing the plug) is the one job we recommend a licensed electrician handle. Everything else is DIY-friendly.
Neon sign installation: common mistakes to avoid
- Overloading a single anchor — use two mount points and a stud/anchor rated above the weight.
- Skipping the level — even a 1° tilt is obvious on a lit sign.
- Adhesive on textured or unpainted/uncured walls — it will let go; use a mechanical anchor.
- Cord across a walkway — plan the outlet run before you drill.
- Mounting before testing — always confirm it lights first.
Troubleshooting
- Won’t power on: check the outlet, reseat the adapter fully, and make sure the remote/dimmer isn’t set to off or zero.
- A section is dim or flickering: usually a loose connector at the adapter — unplug, reseat, retry. If it persists, check our neon sign FAQ or contact us.
- Won’t sit flush: your two standoffs aren’t level — loosen one and re-check.
- Anchor spins / won’t grip: the hole is oversized — move over an inch and use a larger anchor or hit a stud.
Frequently asked questions
Written by the Neon Signs Depot workshop — we design and manufacture every sign we sell, and we hand-test each one before it ships, and we build every sign for straightforward neon sign installation. Backed by a 2-year manufacturer warranty.